When deciding the fingering for a passage of music there will usually be a choice and no single fingering will be without its advantages or disadvantages. Try to arrive at the best compromise for you between what is simplest for the brain and what feels most comfortable for the fingers.
The fingers like:
- playing in numerical order
- playing the same fingers in each hand
- minimising changes of hand position
- shorter fingers avoiding black notes but only if possible easily
- placing strongest fingers on stressed notes
- grouping fingering to match stress patterns of the music
The brain likes:
- Simplest possible fingering patterns (e.g. numerical order)
- Repeated musical patterns to be mirrored by repeated fingering patterns
Two myths about fingering that must be dispelled
MYTH [1] that the thumb is not allowed to play black notes
The thumb is a shorter finger and is, therefore, not the first candidate for playing the black notes but there are many occasions - from repertoire of all periods - when the thumb is the most sensible finger to use on a particular black note.
MYTH [2] - that you should change finger to repeat a note. This is only true when the repetition is too fast for a single finger to accomplish it. The myth arose from poorer actions on early pianos that frequently either jammed or failed to play on repetition. The idea of changing the finger was that the player would be sure to have released the key fully before replaying it. This meant the notes would be less likely to jam or not sound. Modern piano actions make this precaution totally unnecessary.
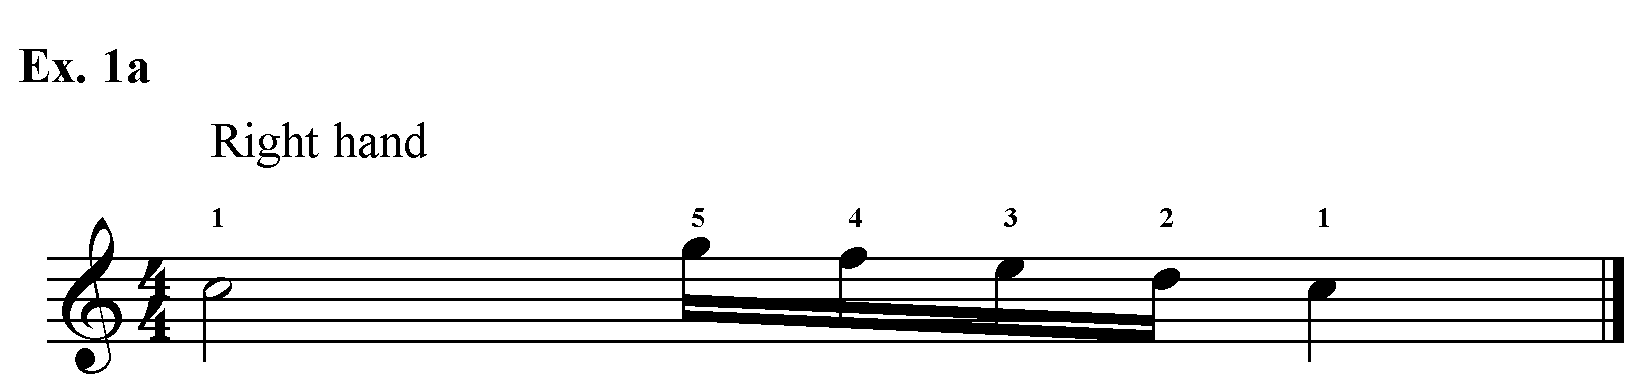
[1] Playing in numerical order
Ex. 1a shows a very simple example of the fingers playing in numerical order.
Braille music example
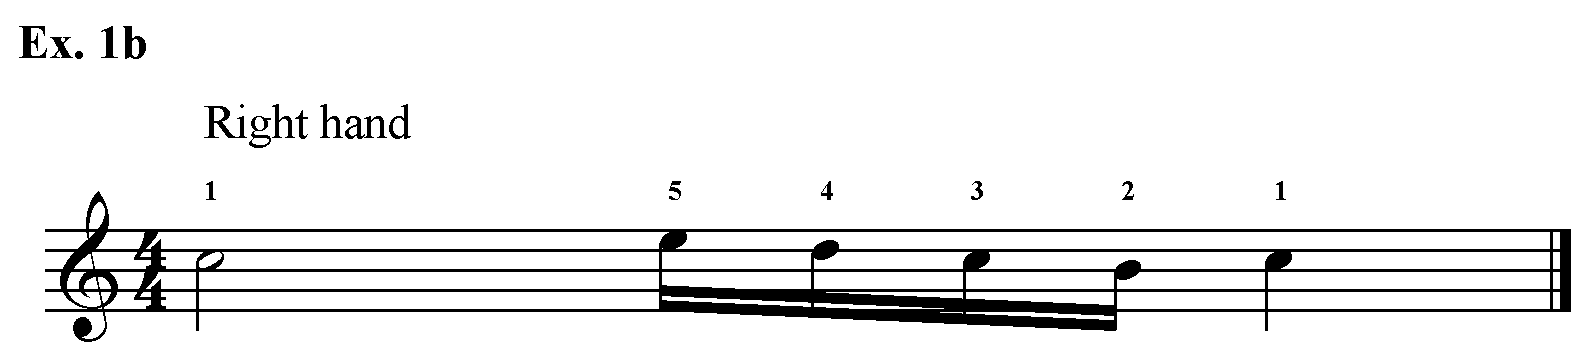
Ex. 1b shows how the same fingering pattern would suit a slightly different melodic line. Physically this passage feels exactly the same as Ex. 1a except that the thumb is positioned under the hand.
Braille music example
Ex. 1c shows how Chopin exploits this principle to simplify a passage in the "Revolutionary" study. In his fingering each of the descending 4-note scalic passages are fingered 1,2,3,4 regardless of the disposition of black and white notes.

Braille music example
Back to Principles of fingering index
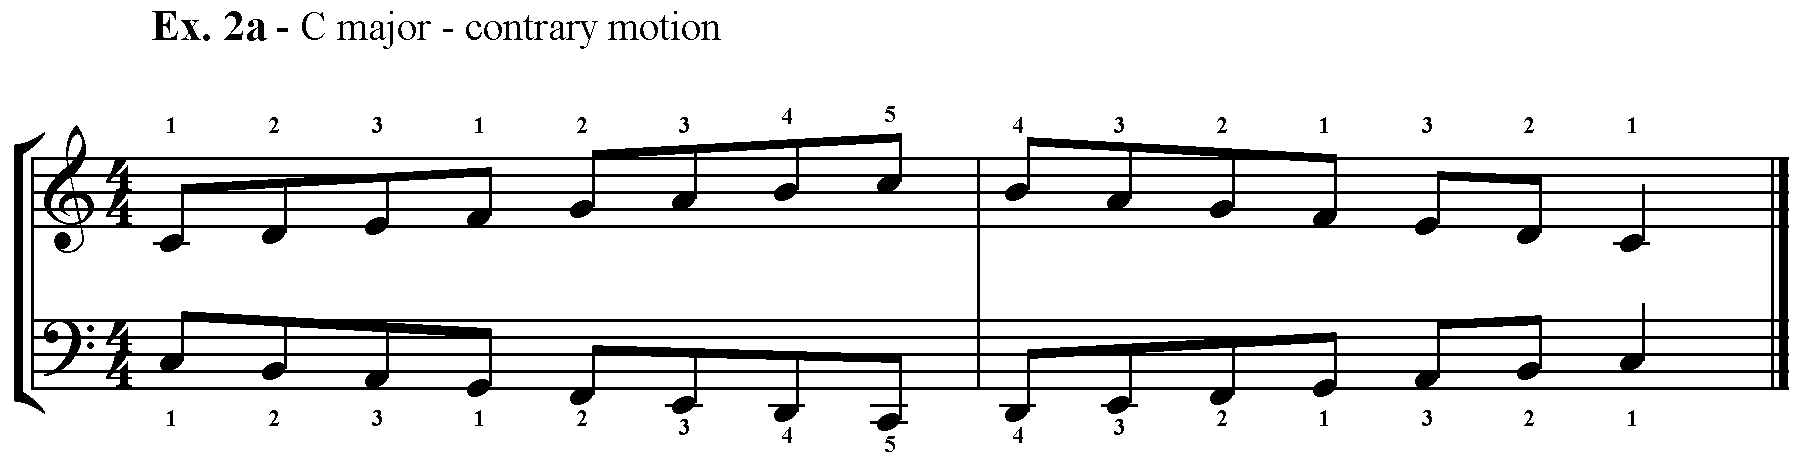
[2] Playing the same fingers in each hand
Ex. 2a shows a scale of C major in contrary motion. This is often the first scale for two hands taught to beginners and there is a good reason for this. The hands find it easy to play the same fingers together in each hand. Of course, what this really means is that the mind finds it easy to control the hands when they are expected to do the same thing at once.
Braille music example
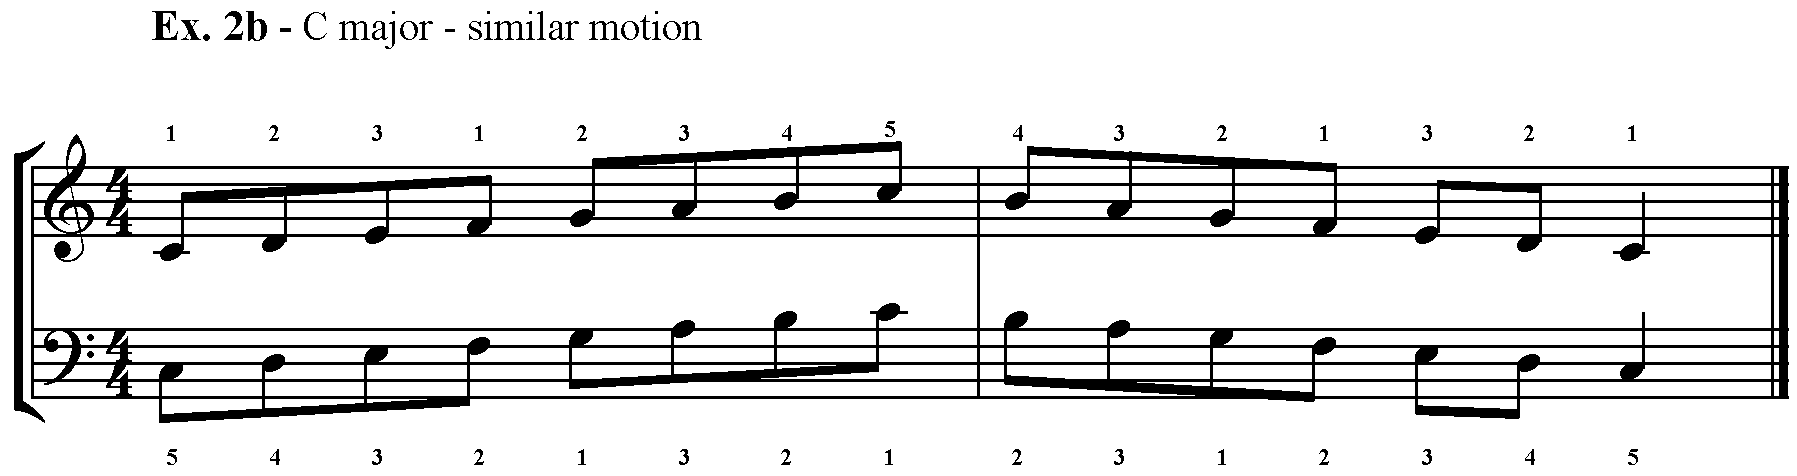
Ex. 2b shows the scale of C major in similar motion. In this scale the hands are rarely playing the same fingers at the same time and it takes beginners longer to master than the contrary motion scale.
Braille music example
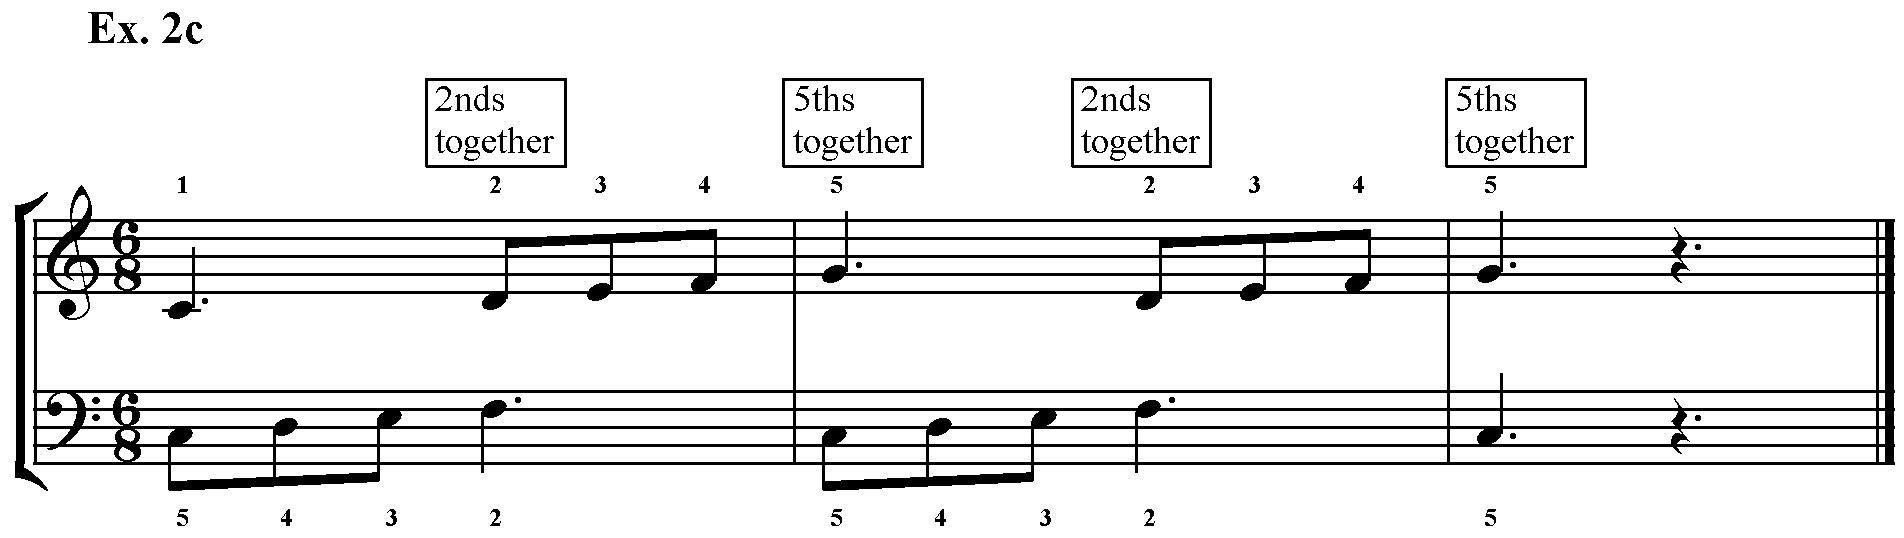
Ex. 2c shows how this principle can be used to help coordinate the hands even when, as is usually the case, they cannot play the same fingers together all the time. In Ex. 2c the hands are able to play the same fingers together on the main beats and these moments help to coordinate the hands which are, otherwise, moving quite independently of one another.
Braille music example
Back to Principles of fingering index
[3] Minimising changes of hand position
There are 88 keys on a piano and we only have 10 fingers. This means that we are going to have to move our hands around the keyboard in the course of most pieces of music. Just as the movements of the fingers within one hand position need to be practised, so too do the changes of hand position themselves. If they are not practised they can lead to:
- tension in the arms, wrist and fingers
- inaccurate contact with the keys of the new hand position
In all aspects if piano playing it makes sense to be economical with movement and the planning of hand positions and their changes is vital to reliable performance.
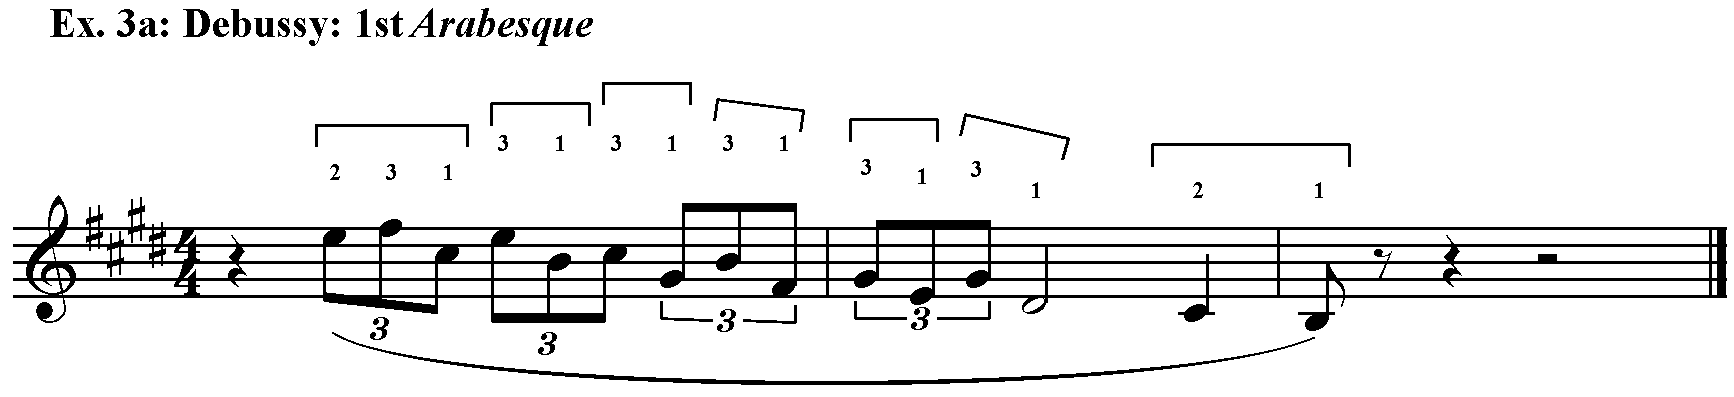
Ex. 3a shows a passage for right hand from Debussy's 2nd Arabesque. The fingering shown is NOT recommended! It shows what can happen when the fingering is not thought about and planned in advance. The player in this example has ended up using only two fingers to work his way down the keyboard.
Braille music example
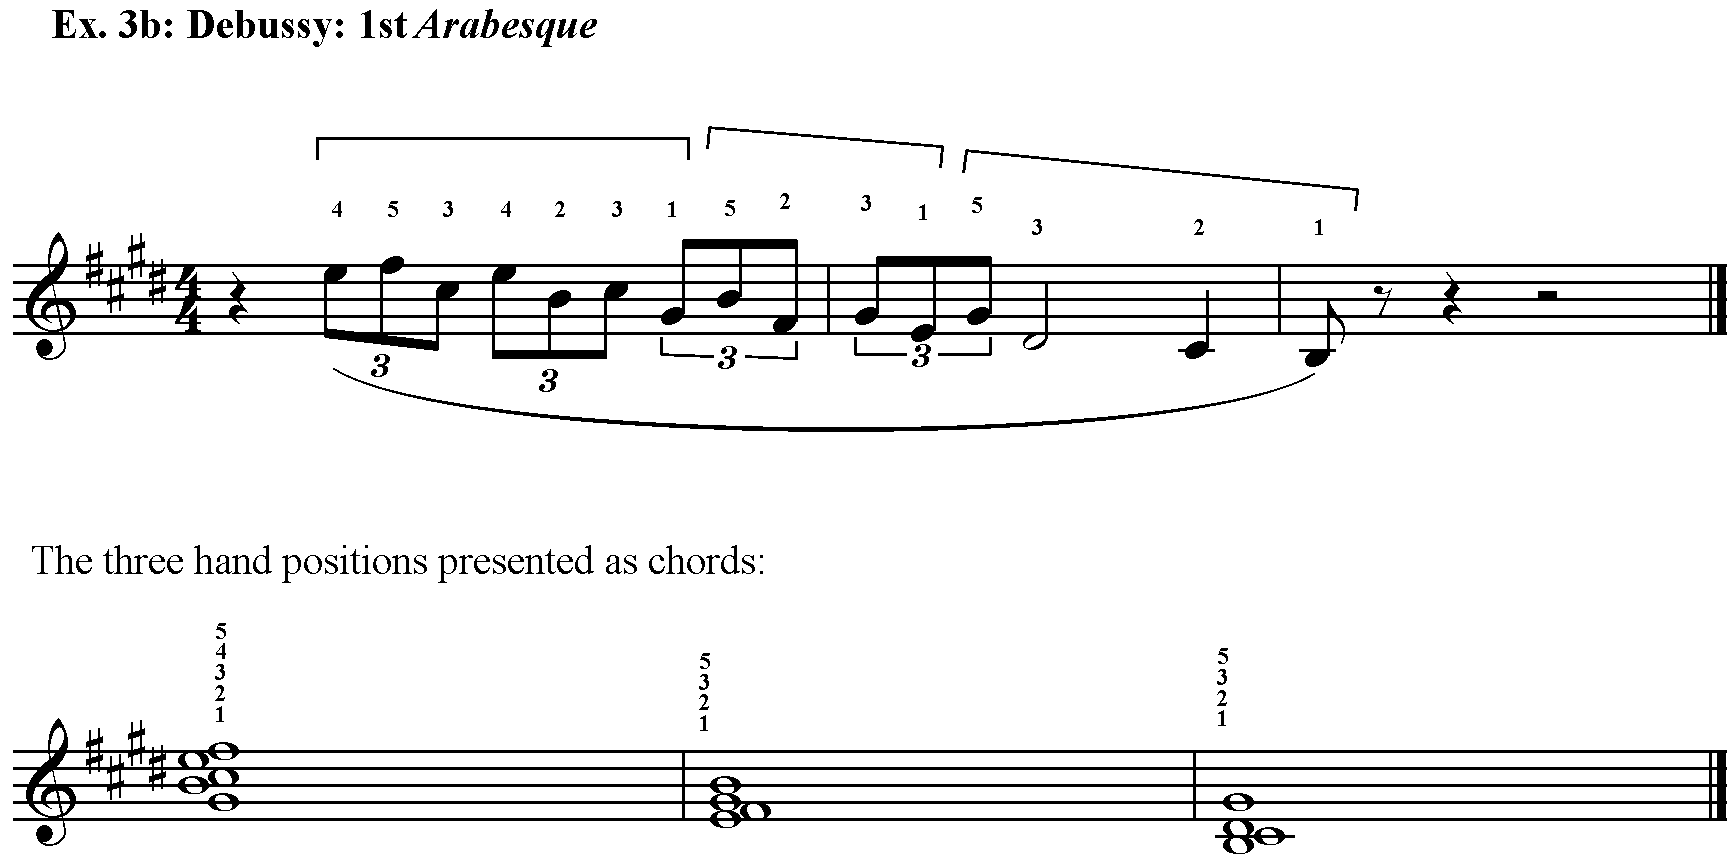
Ex. 3b shows a very different approach to the same passage. Instead of the 7 hand positions used in Ex. 3a this approach uses only three. This is achieved by using all of the fingers of the hand more. For example, the first 7 notes of the passage are all encompassed within one basic hand position using all 5 fingers of the right hand.
Once such a fingering is planned it can be very effectively practised by treating each hand position as a chord and practising jumping from one chord to the next. Once the movements between positions is accurate and fluent the fingerwork within each position has a far better chance of flowing smoothly.
Braille music example
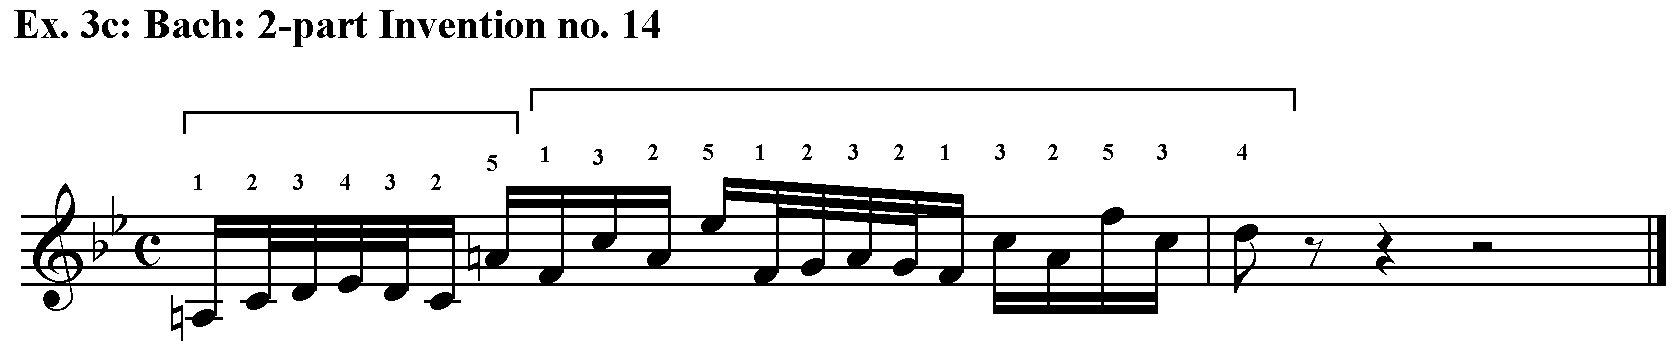
Ex. 3c shows a passage from a Bach 2-part invention broken down into two basic hand positions. Each basic hand position is defined by the position of the thumb and within each position the hand has to change shape slightly in order to accommodate all the notes. In the first position the 5th could not easily reach the A natural if the 3rd and 4th fingers were still sitting on the D and E flat. After these notes have been played the hand expands slightly to reach the A natural.
Similarly in the second position the hand must contract a little in order to play the FGAGF before expanding once more to play the last six notes of the position.
Braille music example
Back to Principles of fingering index
[4] Shorter fingers avoiding black notes but only if possible easily
The thumb and 5th finger are significantly shorter than the other fingers and this means that if they are to reach the black notes the whole hand has to move forward. There are times when this is the best thing to do but in most situations the longer fingers are used for the black notes.
Ex. 4a shows the scales of E major and F major with their conventional fingerings. The four black notes of E major are handled by the 2nd, 3rd and 4th fingers. In the F major scale the passage of the thumb is delayed until after the B flat, which is played with the 4th finger. Try putting the thumb under after the three and playing the B flat with the thumb and you will see how awkward this is.

Braille music example
Ex. 4b is an extract from Chopin's "Minute" Waltz, Op. 64, no. 1. Here again, by using the long fingers on the black notes and arranging that the thumb and 5th will be used on white notes, the passage flows easily.

Braille music example
Back to Principles of fingering index
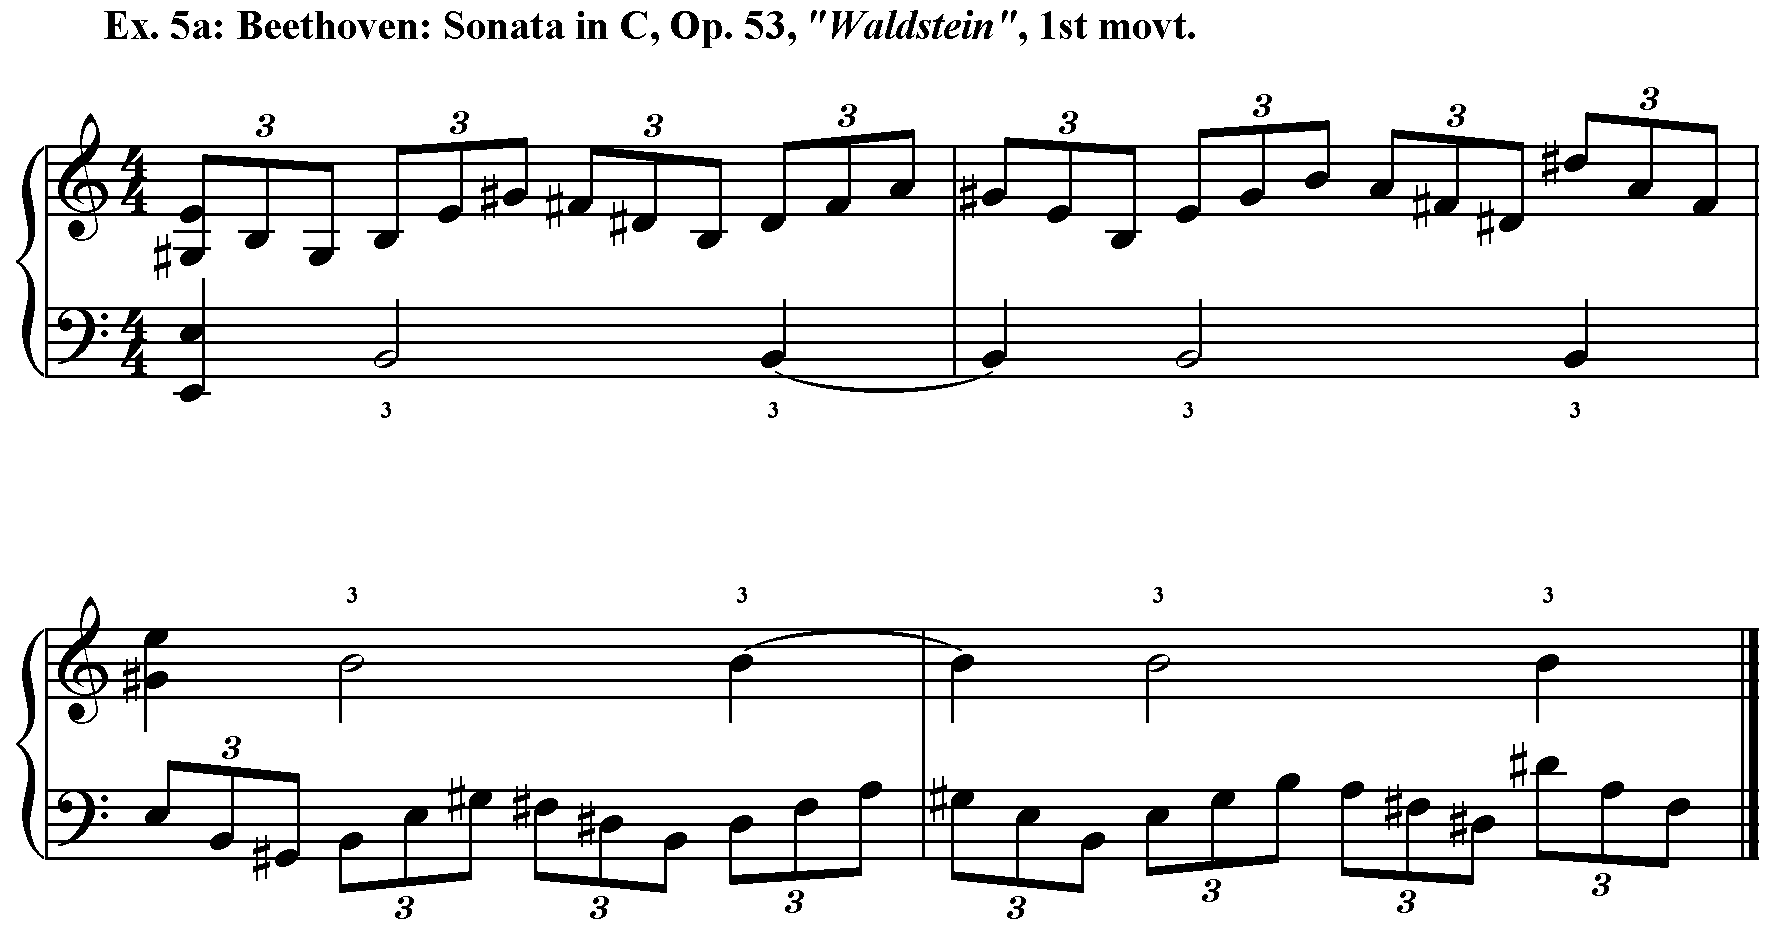
[5] Placing strongest fingers on stressed notes
Although we spend many hours practising to increase the strength and agility of all our fingers some fingers will always remain stronger than others. The thumb, 2nd and 3rd - particularly the thumb and 3rd - are physiologically the strongest fingers and their strength can be exploited by using them on notes that require stress.
In Ex. 5a the note B is to be brought out as a syncopated pedal note, first in the bass and then in the treble. This cam be achieved by using the 3rds in the left hand and then the right hand.
Braille music example
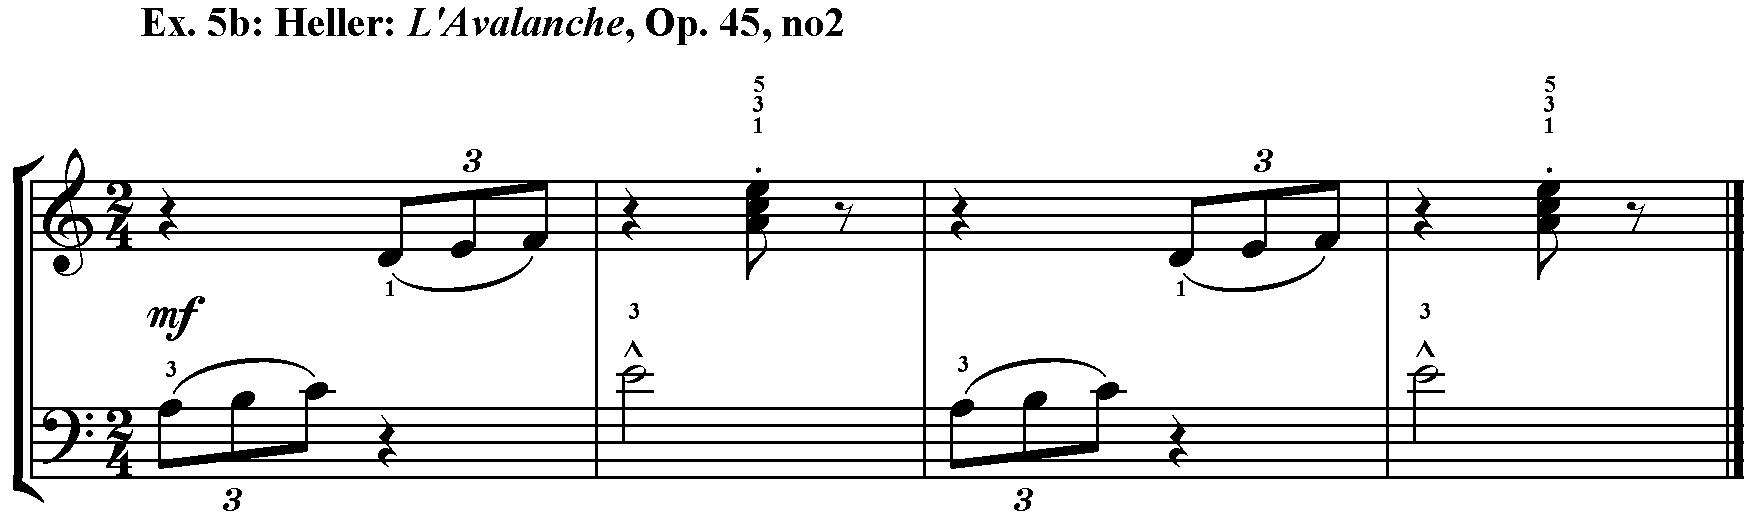
In Ex. 5b all the notes on the beats are played with either thumbs or 3rds or, in the case of the triads, with the 1, 3 and 5.
Braille music example
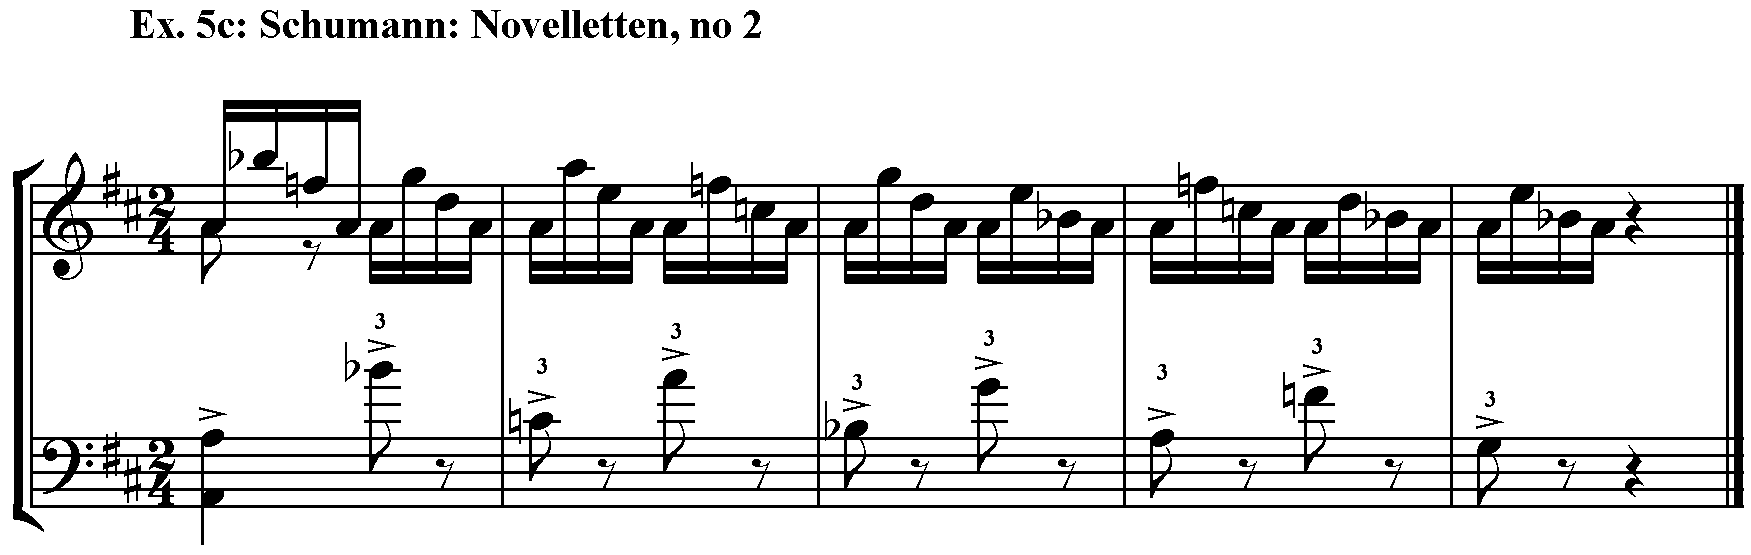
In Ex. 5c Schumann wants the notes in the left hand to ring out above the right hand semiquaver texture. His accents are best achieved by playing all the left hand notes with the 3rd finger.
Braille music example
Back to Principles of fingering index
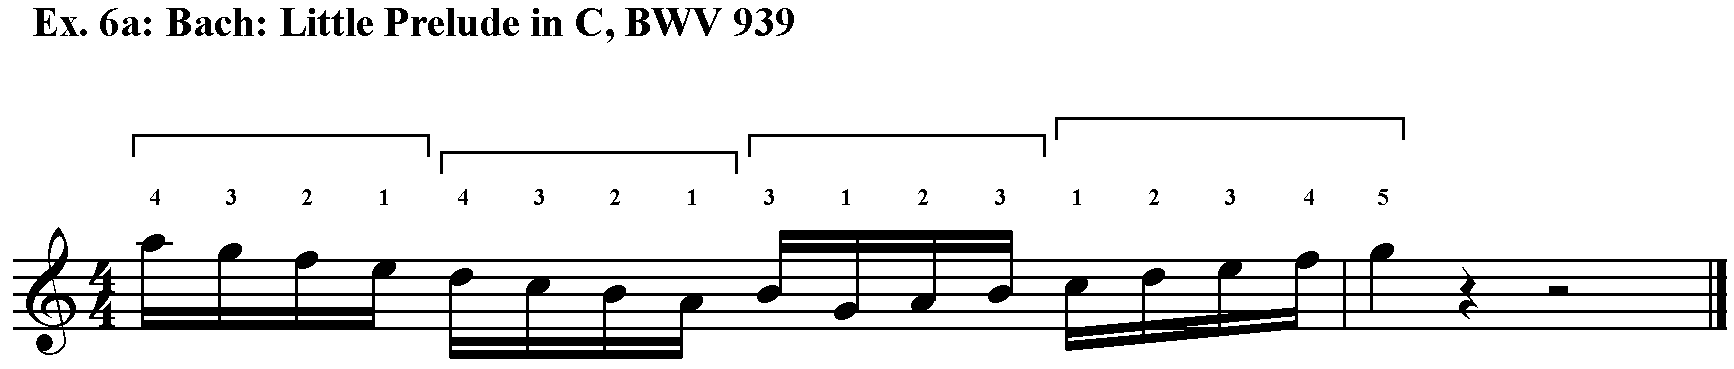
[6] Grouping fingering to match stress patterns in the music
Although we spend hours practising to make the passage of the thumb imperceptible we can allow it to be perceptible at times.
In Ex. 6a the passage of the thumb happens on the beats and we can allow this to give a slight emphasis of the beat.
Braille music example
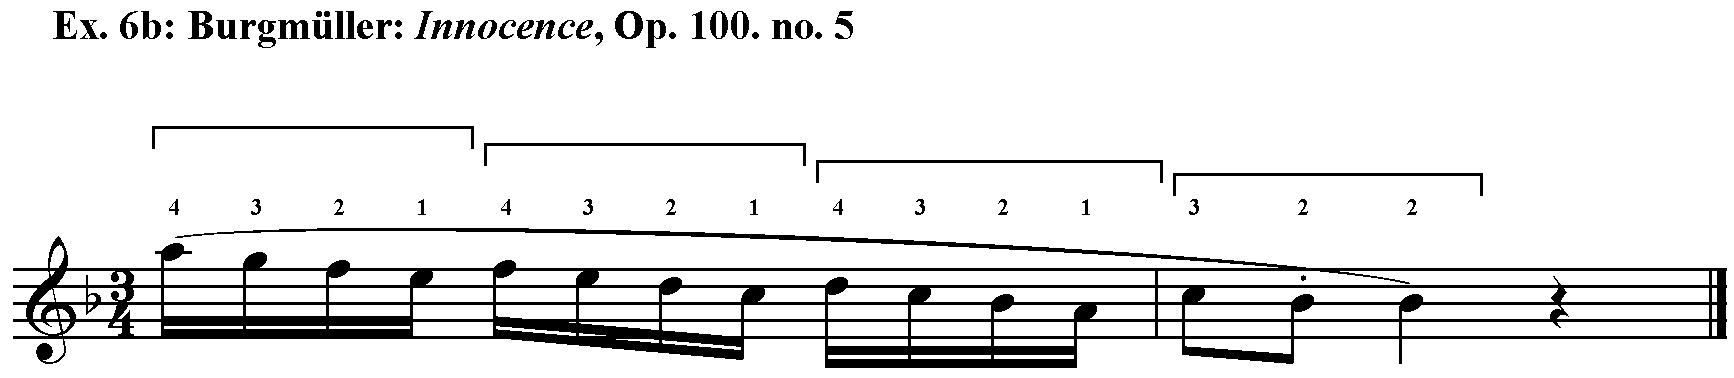
In Ex. 6b the melody moves downwards in 4-note waves. The fingering shown has a change of hand position for each 4-note wave which allows a natural slight emphasis of the beat.
Braille music example
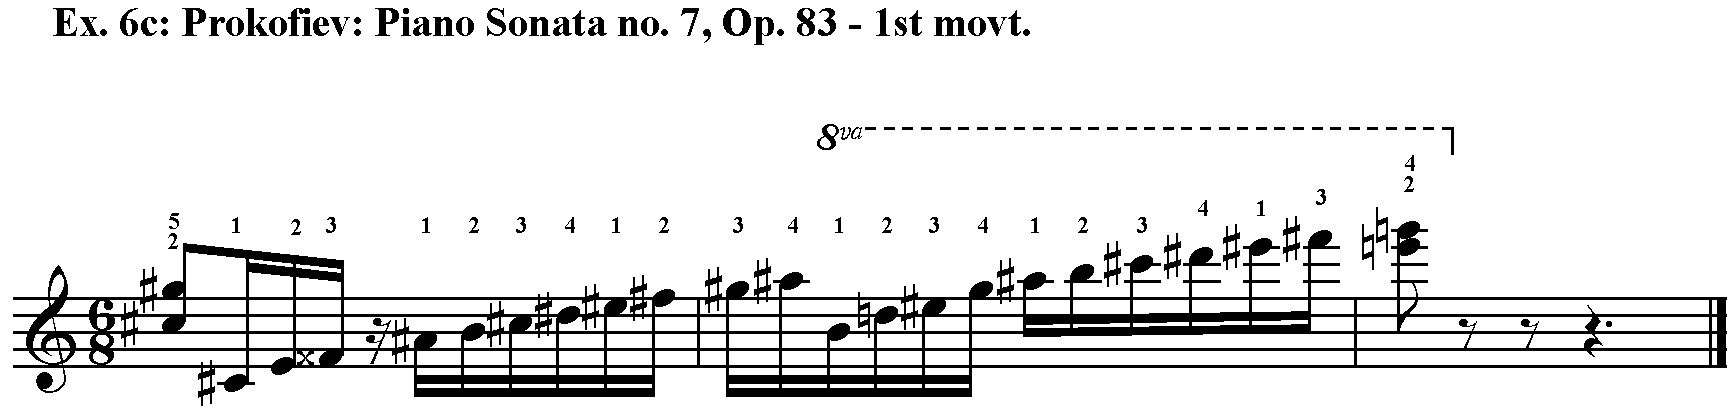
In Ex. 6c the fingering shown enables the hand to flow smoothly up the up the keyboard to the climactic chord whilst ensuring that strong fingers are placed on the beats.
Braille music example
Back to Principles of fingering index
[7] Simplest possible fingering patterns
Playing the piano is a complicated business. There are a great many things to think about - notes, fingering, phrasing, articulation, interpretation etc. - and so fingering patterns that are complicated may well be unreliable in performance.
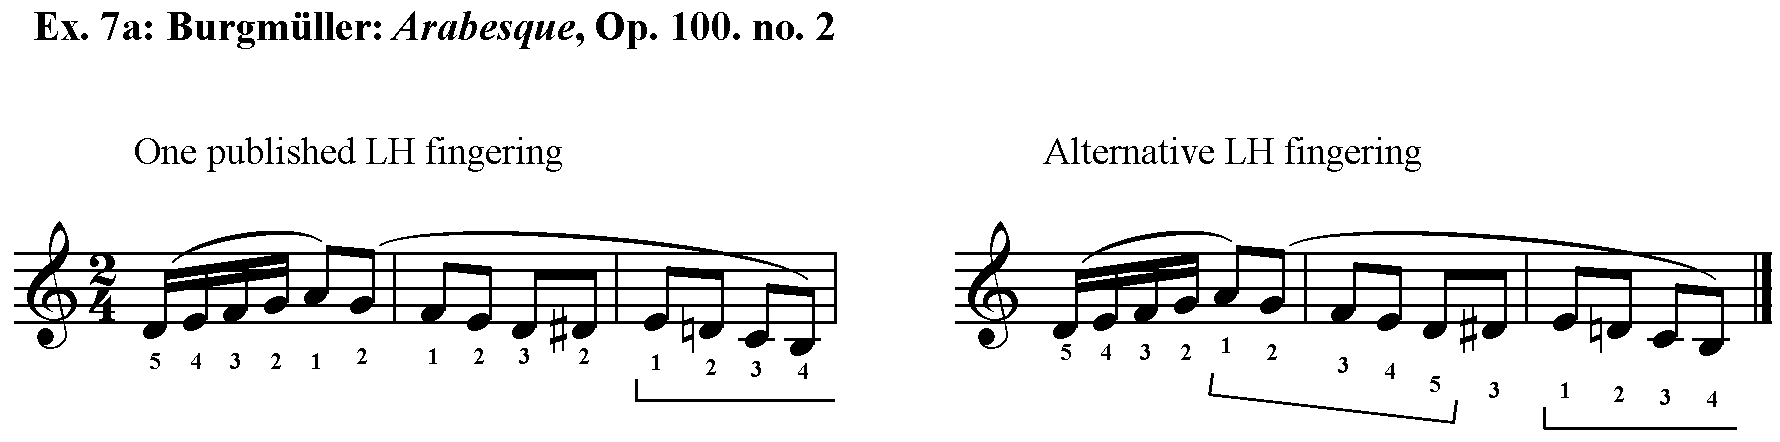
In Ex. 7a the alternative fingering is easier to learn and to coordinate with the right hand. It is probably Burgmüller's own fingering.
Braille music example
Ex. 7b shows three alternative fingerings for a passage from Beethoven's 2nd Piano Concerto. The sequential repetition of a small 4-note motiv is used to carry melody down the keyboard for several octaves. The first fingering, from the Augener edition, makes no attempt to mirror the patterns in the music and, whilst workable, seems unnecessarily complicated.
The second fingering mirrors the motivic structure of the melody precisely and uses the same fingering for each iteration of the motiv. This means that the same finger pattern (5,3,2,1) is played 11 times. It is very simple to learn.
The third fingering addresses the one slight drawback of the second, the fact that when the motiv ends on an E flat this is played with a thumb. It is perfectly possible to do this but for those who find it more comfortable the 2 and the thumb can be swapped around at this point. This will happen three times during this passage.
There is rarely a definitive "right" fingering in piano music. The three fingerings shown here illustrate that point very well. They all work and the careful pianists will try all three and maybe some others in the search for the fingering that suits them best, both mentally and physically.

Braille music example
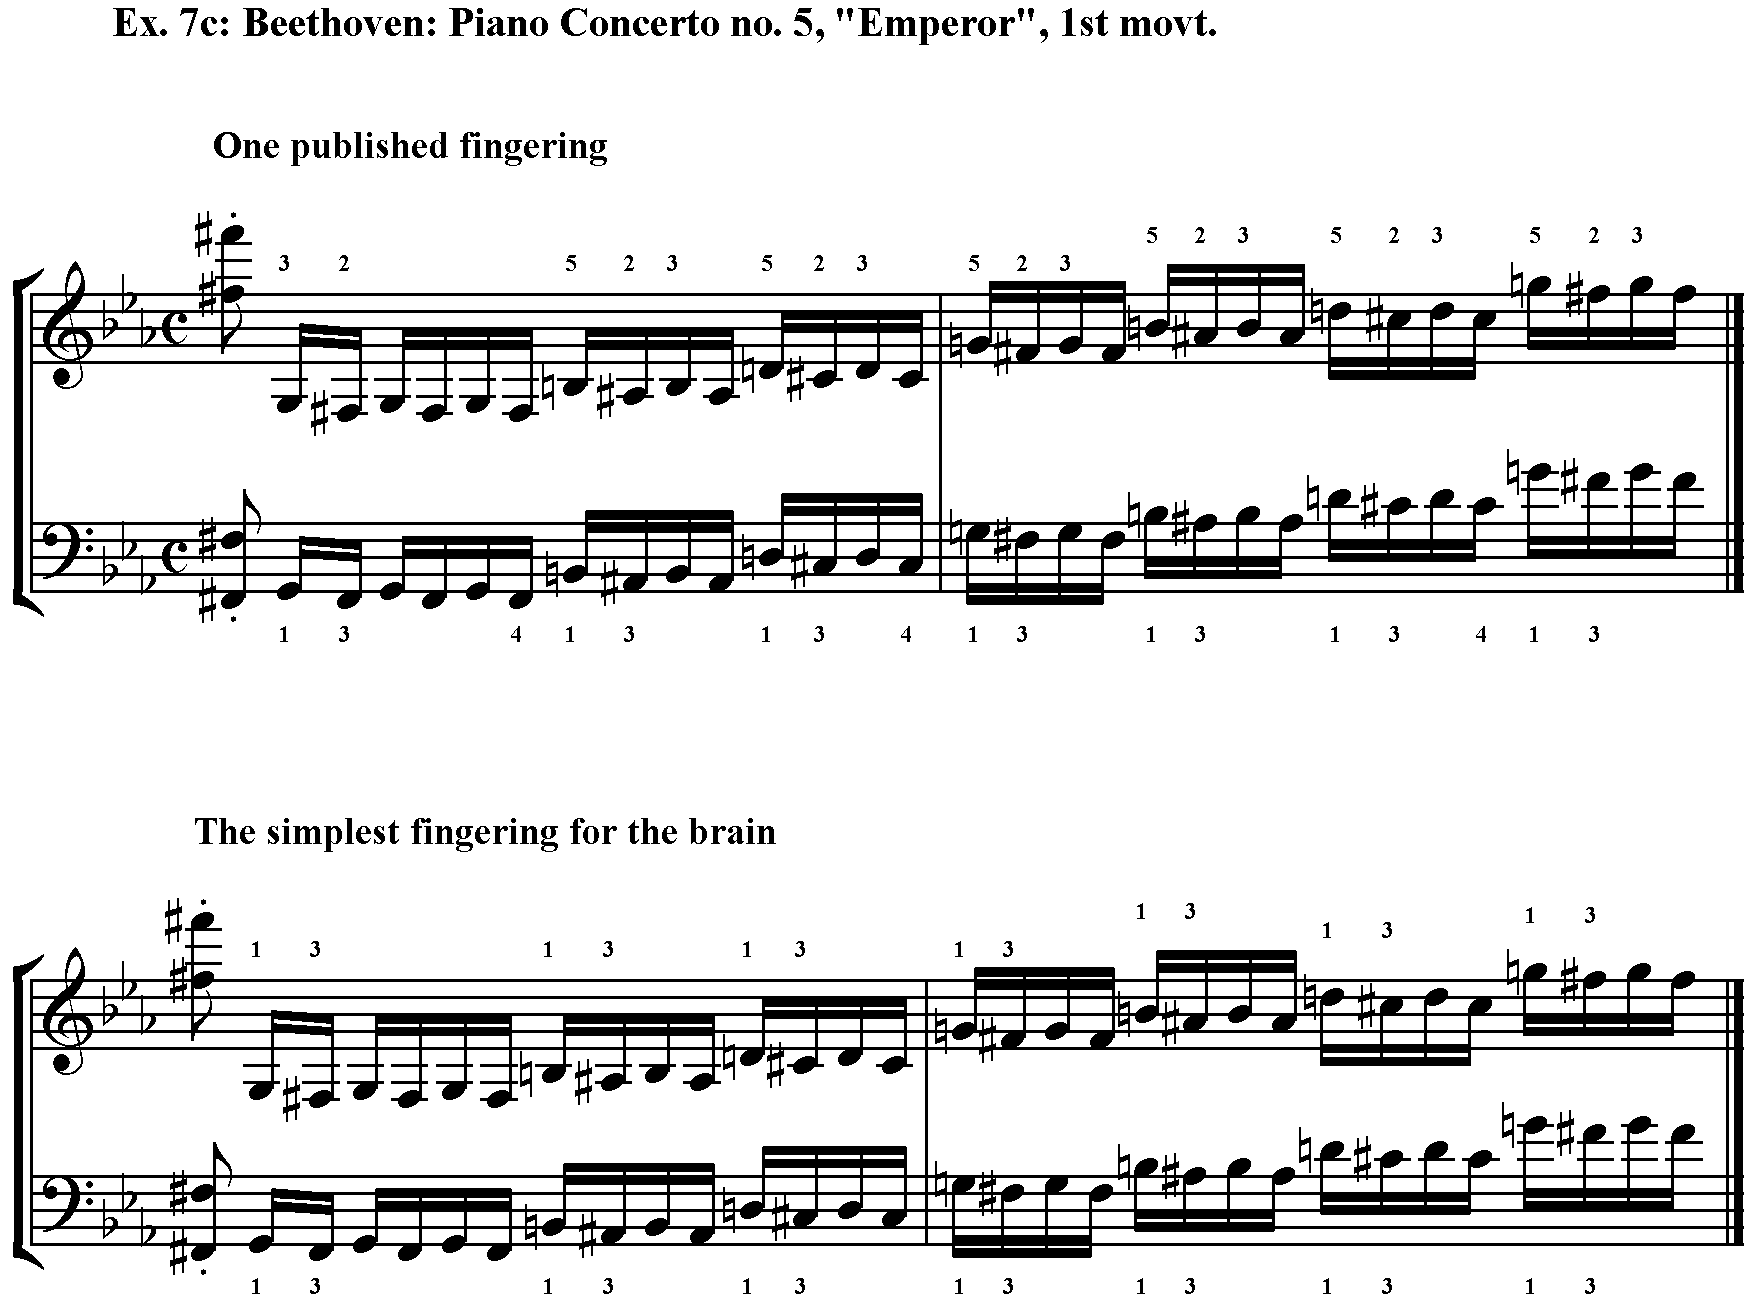
Ex. 7c shows two alternative fingerings for a passage from Beethoven's 5th Piano Concerto. The first fingering, also from the Augener edition, attempts to adjust the fingering in order to facilitate the jumps that take place on each beat. This fingering is workable but it is more complicated than the second fingering shown.
In the second fingering there is no attempt made to reach upwards with the fingers at the jumps on the beats. Instead the jumps have to come from the arms which carry the thumbs of both hands into their new positions for each beat. This is not only very easy to learn but it builds in the accentuation of the beats that gives this passage its driving intensity.
Braille music example
Back to Principles of fingering index
[8] Repeated musical patterns mirrored by repeated fingering patterns
If a passage of music is repeated we would expect to play it with the same fingering. If the passage is repeated higher or lower than it originally appeared this is known as sequential repetition. Sometimes the fingering for the original passage is not such a good fit for the sequential repetition, if there is a different disposition of black and white notes, but where it does fit it makes sense to use the same fingering. Not only does this make the music easier to learn but it reinforces physically the pianist's awareness of symmetries in the musical structure of a piece.
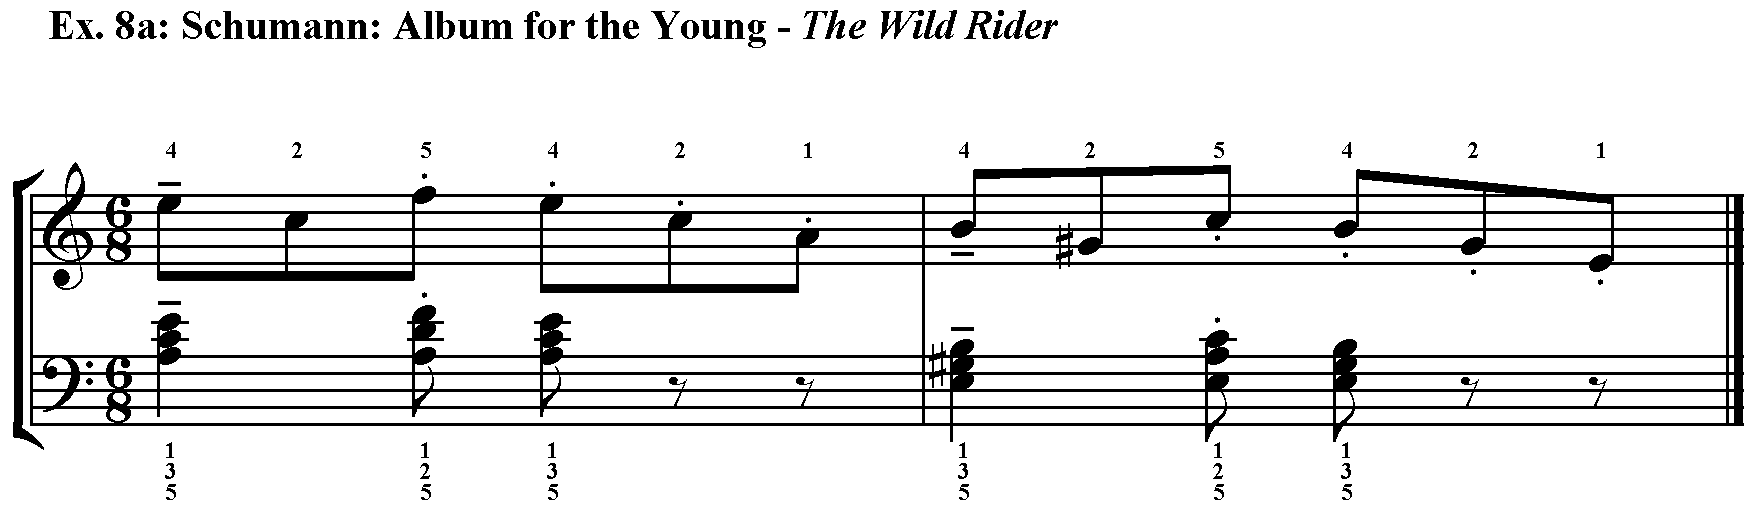
In Ex. 8a the fingering in both hands works very well for the first bar and its sequential repetition in the following bar. Although there are black notes in the second bar, where there was none in the first, they do not fall under the thumbs in either hand.
Braille music example
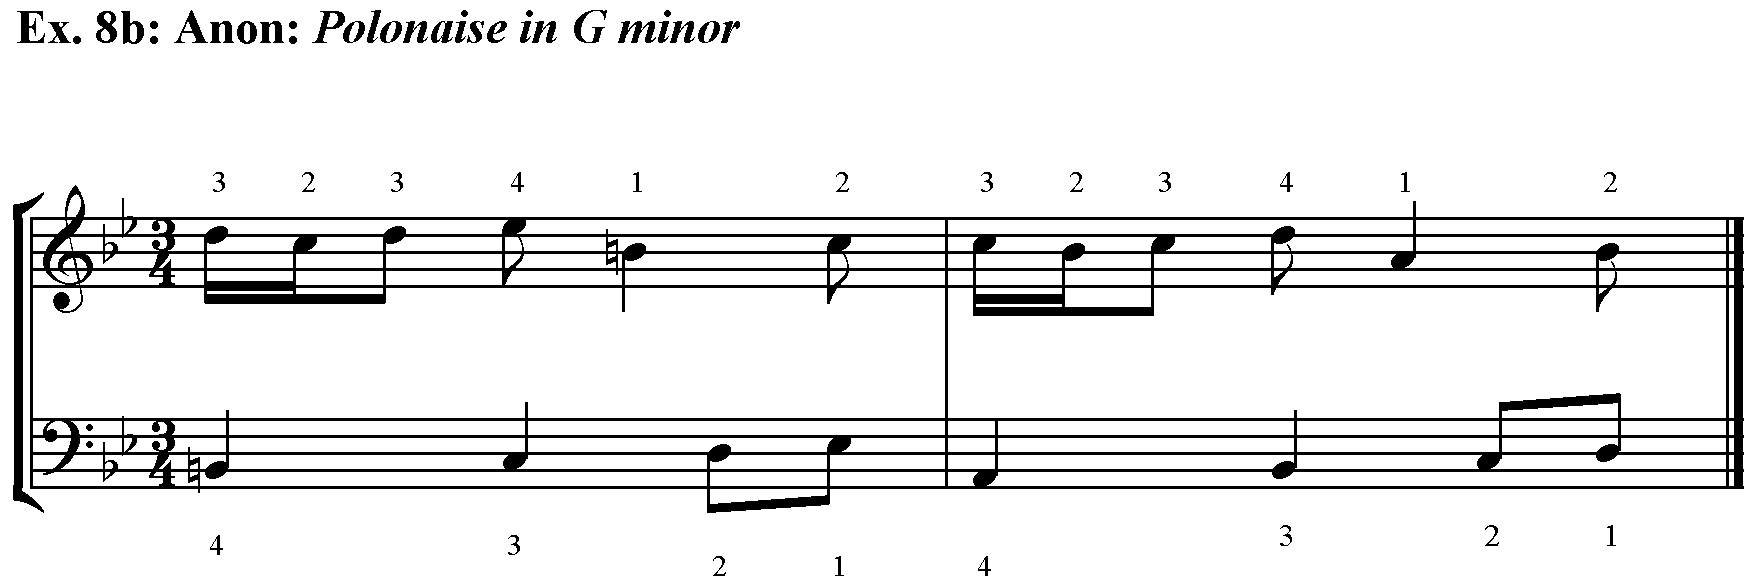
Ex. 8b shows an instance where the fingering has been worked out by working backwards. Noticing the sequential repetition in the two bars the player has opted for a fingering that works in both bars, although slightly more comfortably in the second. In the first bar the left hand has a thumb on E flat. This requires the left hand to play this bar in a slightly forwards position to enable the short thumb to reach the black note. This minor adjustment is amply justified by the fact that now the same fingering works for both bars. Not only is this easier to learn but the player experiences a strong sense of the musical structure being mirrored in the fingering.
Braille music example
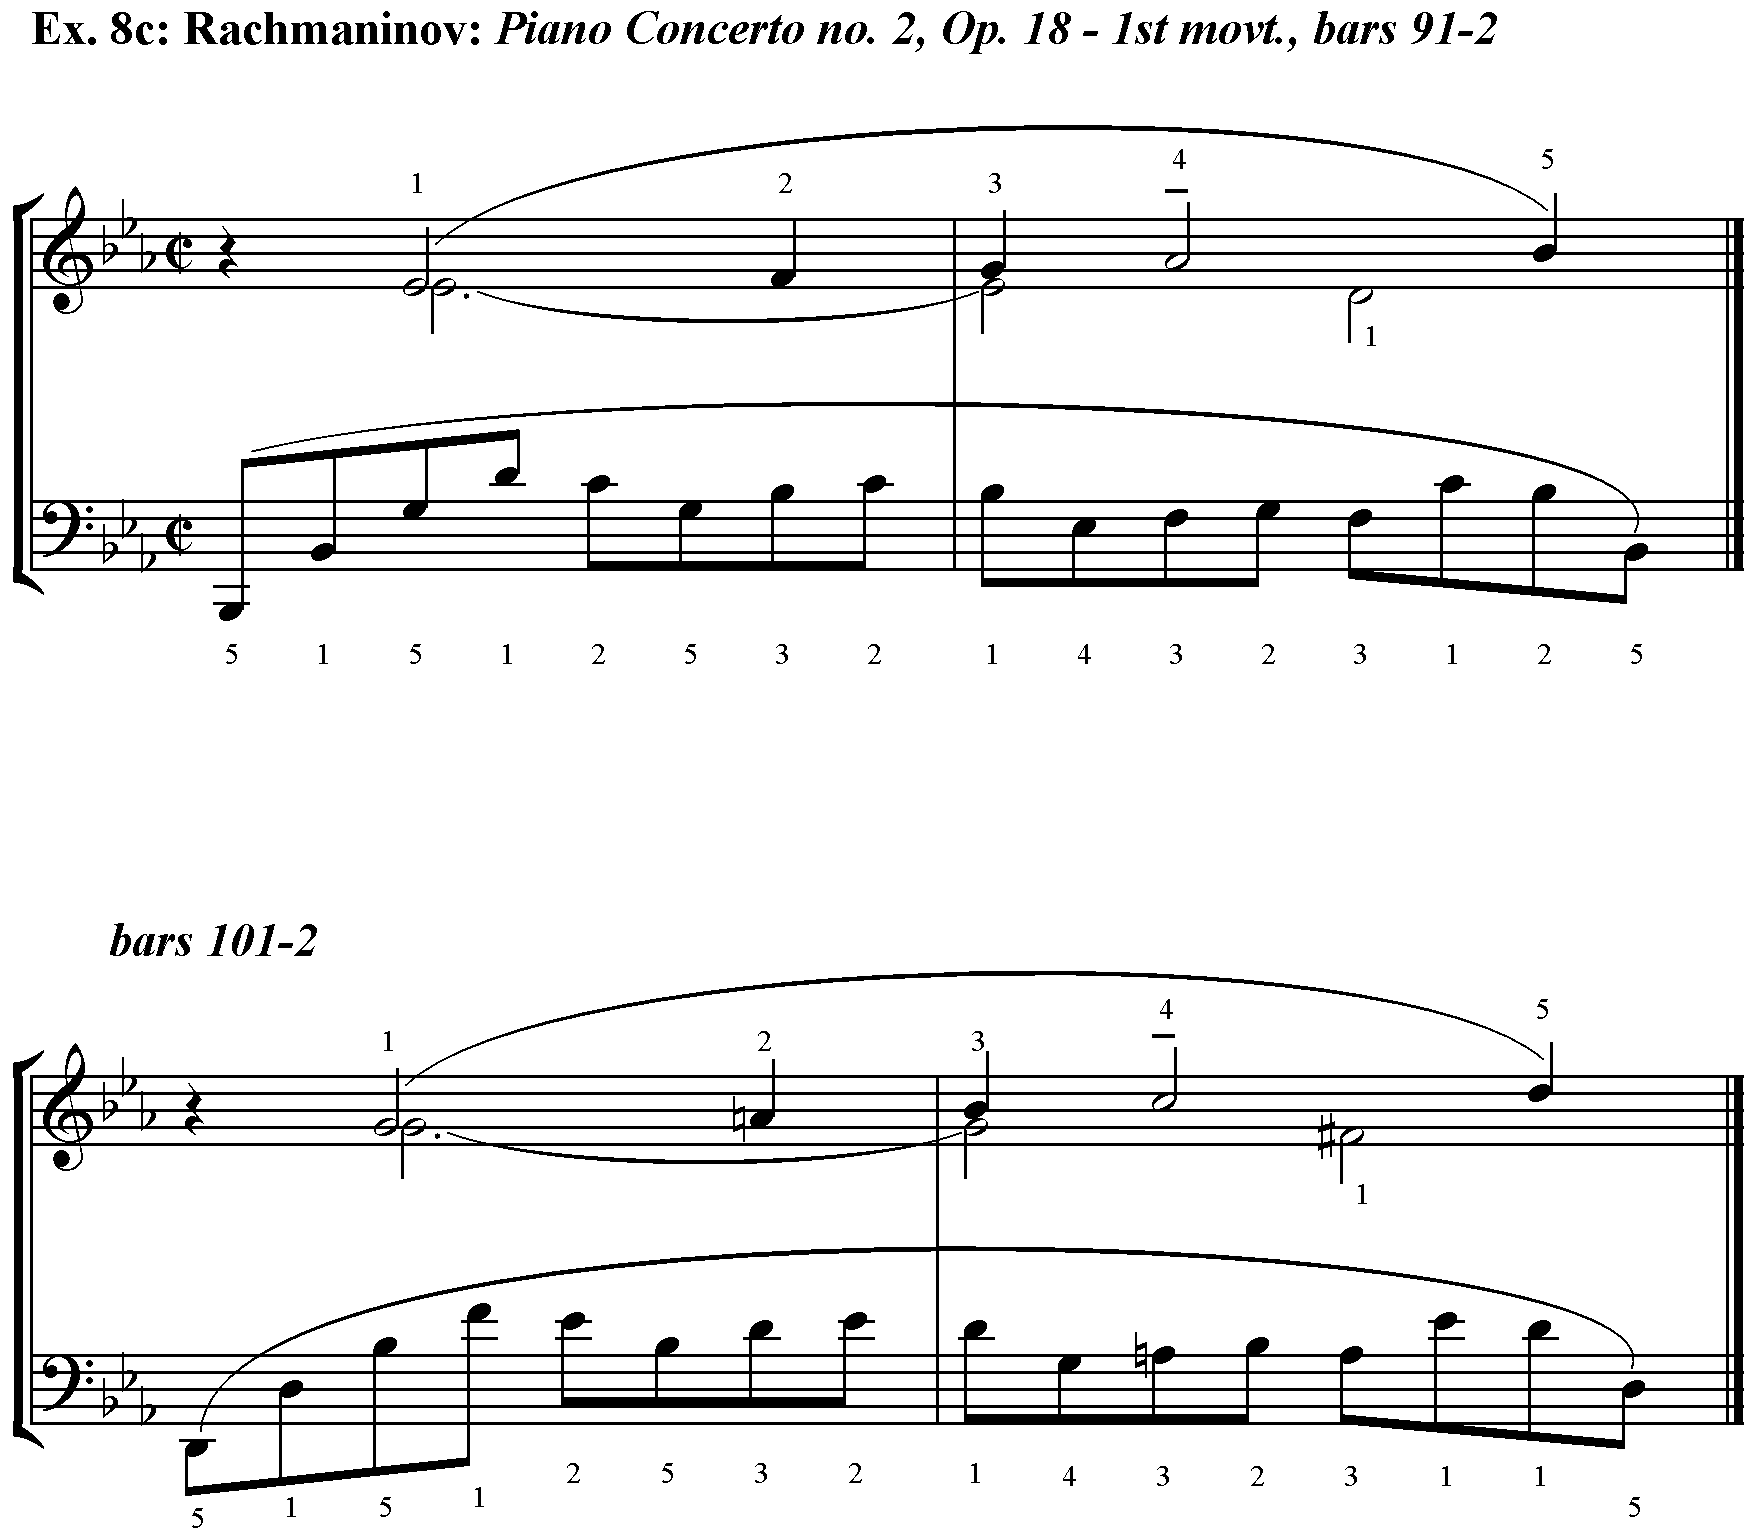
Ex. 8c shows two short extracts from Rachmaninov's 2nd Piano Concerto. Bars 91-2 are in E flat major and bars 101-2 are a direct transposition of this into G minor. The fingering for bars 91-2 works for bars 101-2 but in Ex. 8c there is one slight adjustment. In the left hand of bar 102 the move from the E flat to the D is effected by a slide of the thumb making it easier to reach down the octave to the lower D.
Braille music example
Back to Principles of fingering index